It’s 2026… Why would you even need to know how to write a check, or address an envelope? Checks are old-school, but they do still pop up in life every now and then, even for Gen Z: rent, contractors, school fees, small businesses, and certain government forms still require them. If you can fill out a check cleanly, you’ll never get stuck when a “we only take checks” situation comes up… And knowing how to correctly address the envelope you send it in is a major part, too.
What You Need Before You Start
For Writing a Check
- A checkbook
- A pen (Not a pencil)
- The correct name of the person or business you’re paying
- The amount you’re paying
For Addressing an Envelope
- Envelope + The letter/document inside
- Recipient’s full mailing address
- Your return address
- A stamp (Or the correct postage)
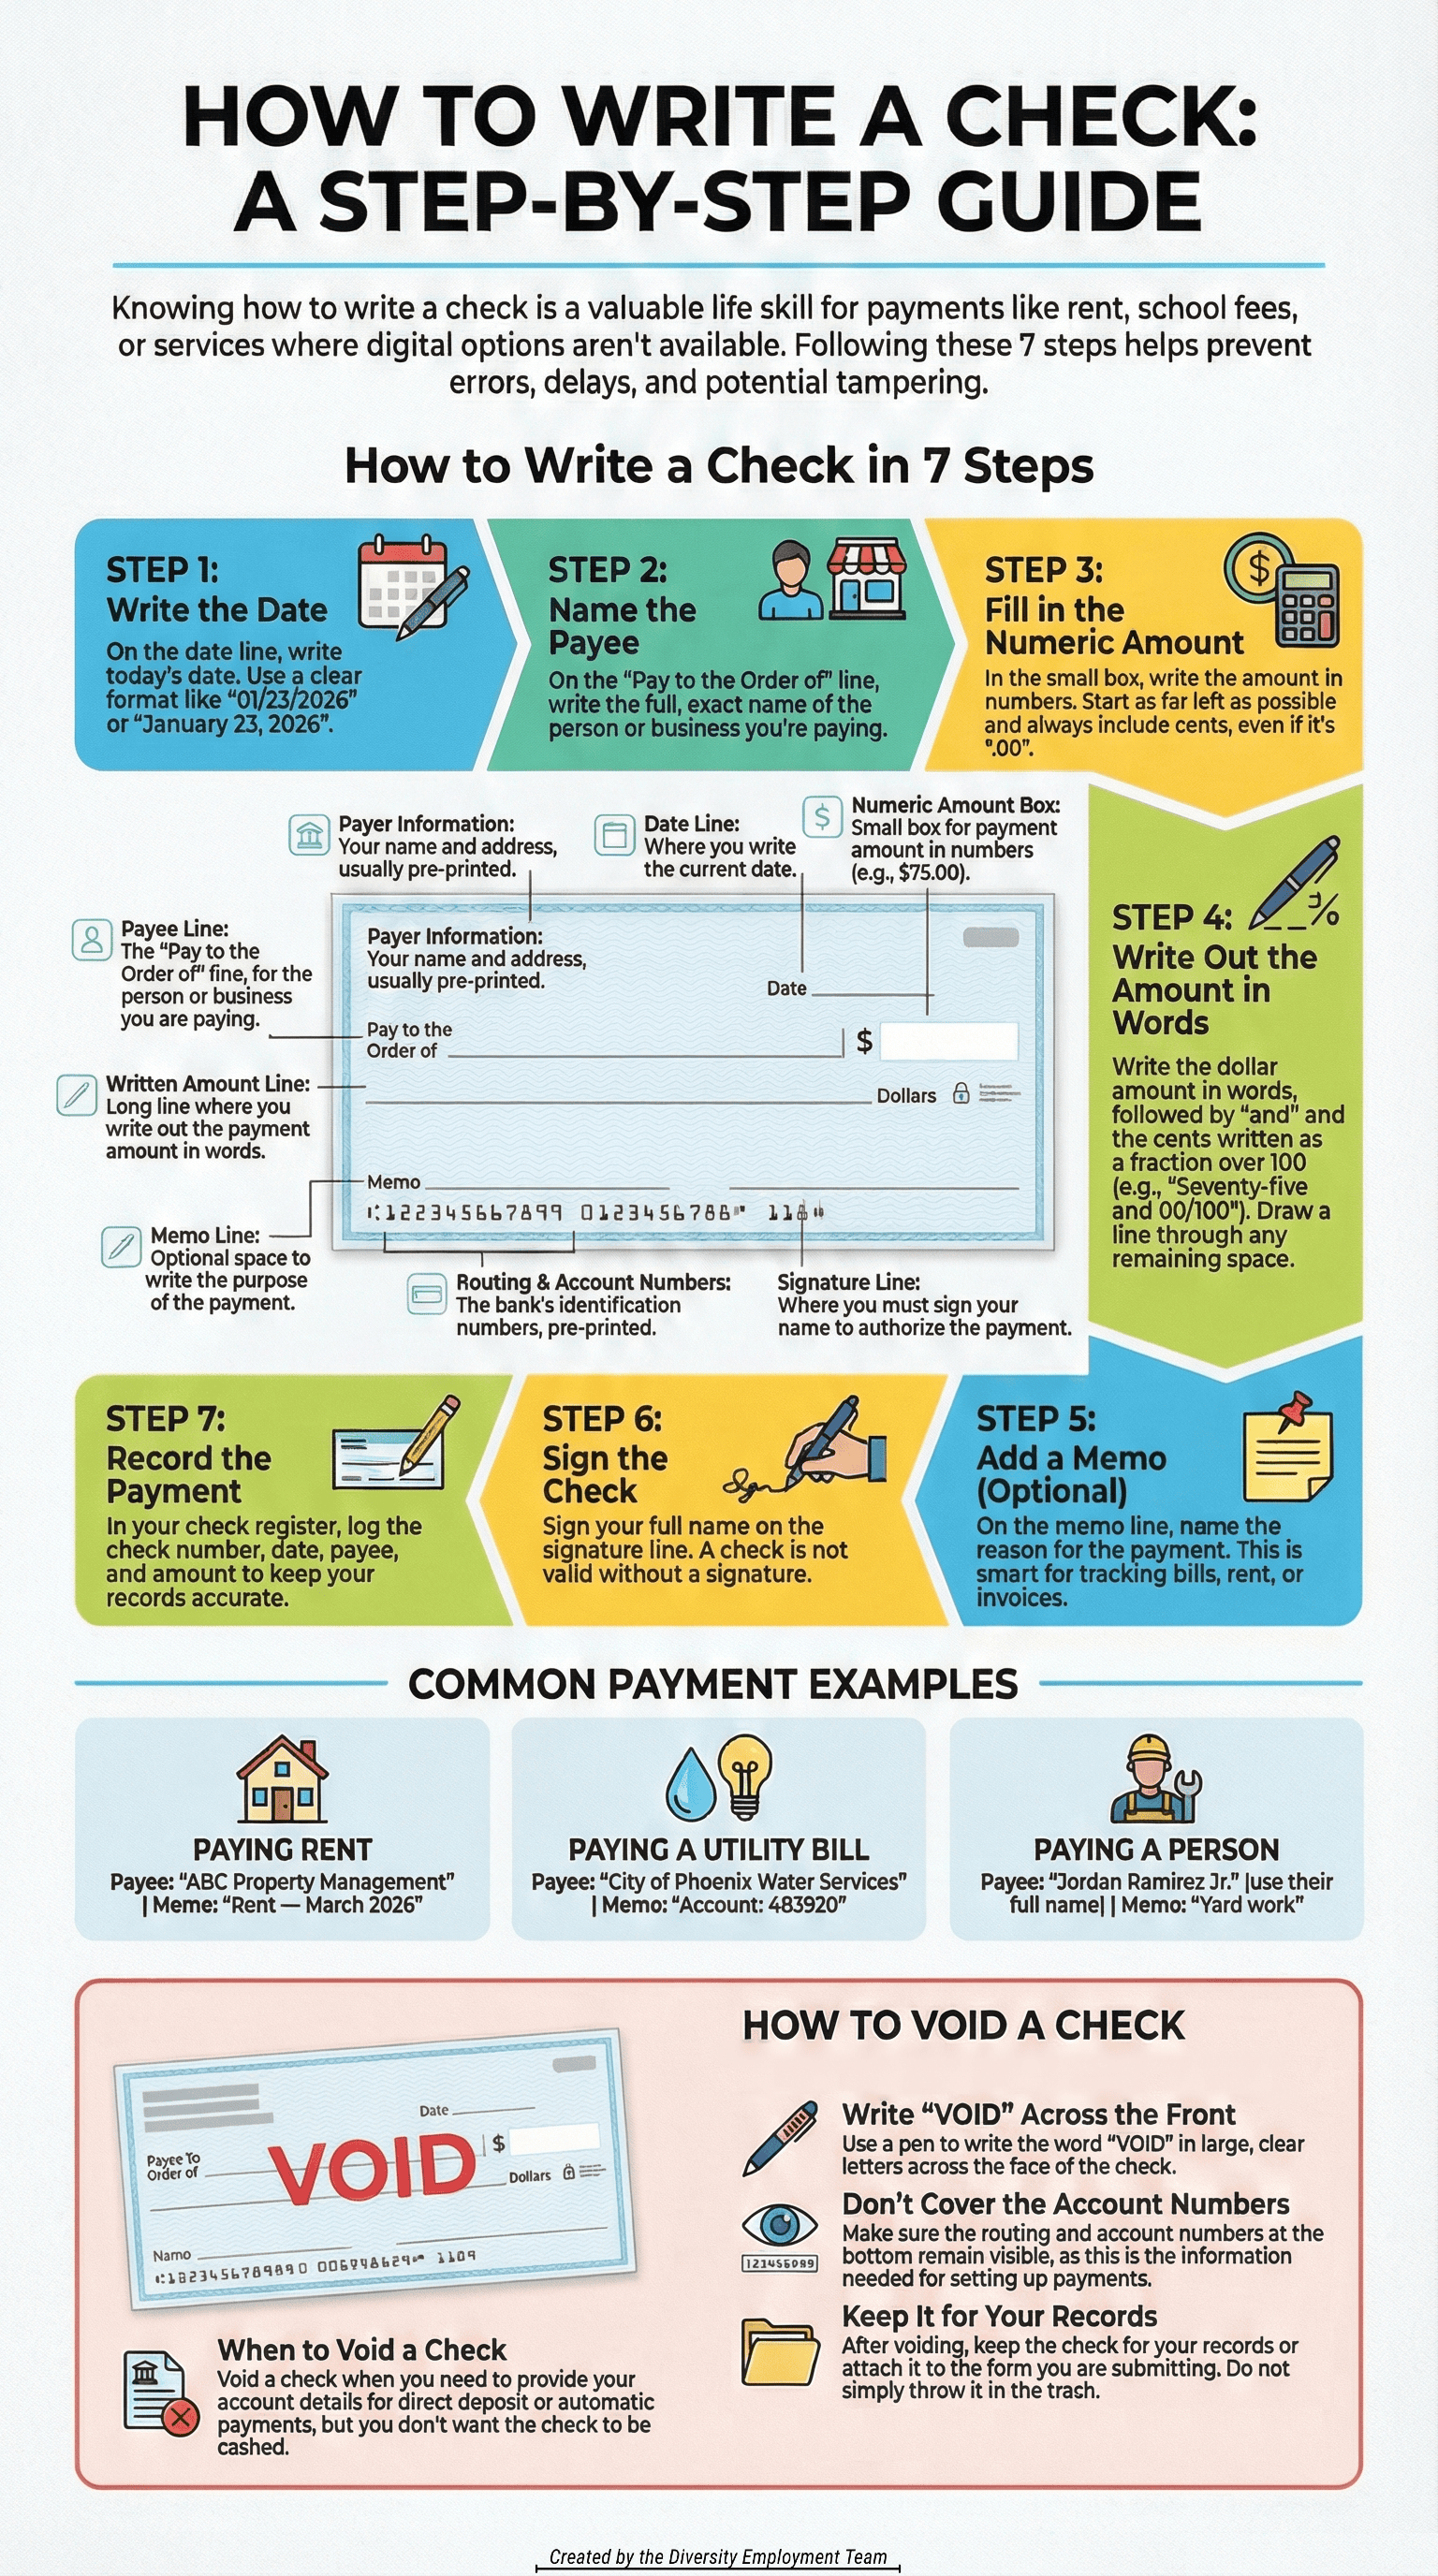
Part 1: How to Write a Check (Step-by-Step)
Grab your supplies and follow along.
It is assumed your checks already have your name and address on them. If not, that’s okay!
- Step 0.5: Write your full name in the top left corner. Under that write your address. Then, under that, goes your city, state, and zip.
Now we’re ready, let’s get to it!
Step 1: Write the Date
Write today’s date on the date line (usually top right area).
Use a Clear Format:
- 01/23/2026 or
- January 23, 2026
Tip: Don’t post-date a check unless the person you’re sending it to has specifically asked you to.
Step 2: Write Who You’re Paying (Payee)
On the “Pay to the Order of” line, write the name of the person or business exact like they do.
Examples
- “ABC Property Management”
- “City of Phoenix Water Services”
- “Jordan Ramirez Jr.”
Tip: If it’s a business, it’s especially important to write the name exactly as it displays on their invoices or bills.
Step 3: Write the Amount in Numbers (the Small Box)
In the small box to the right, write the payment amount using dollars and cents.
Examples
- $10.15
- $75.00
- $1,250.49
Do This to Reduce Mistakes and Prevent Tampering:
- Start as far left in the box as you can
- Always include the cent amount, even if it’s “.00”
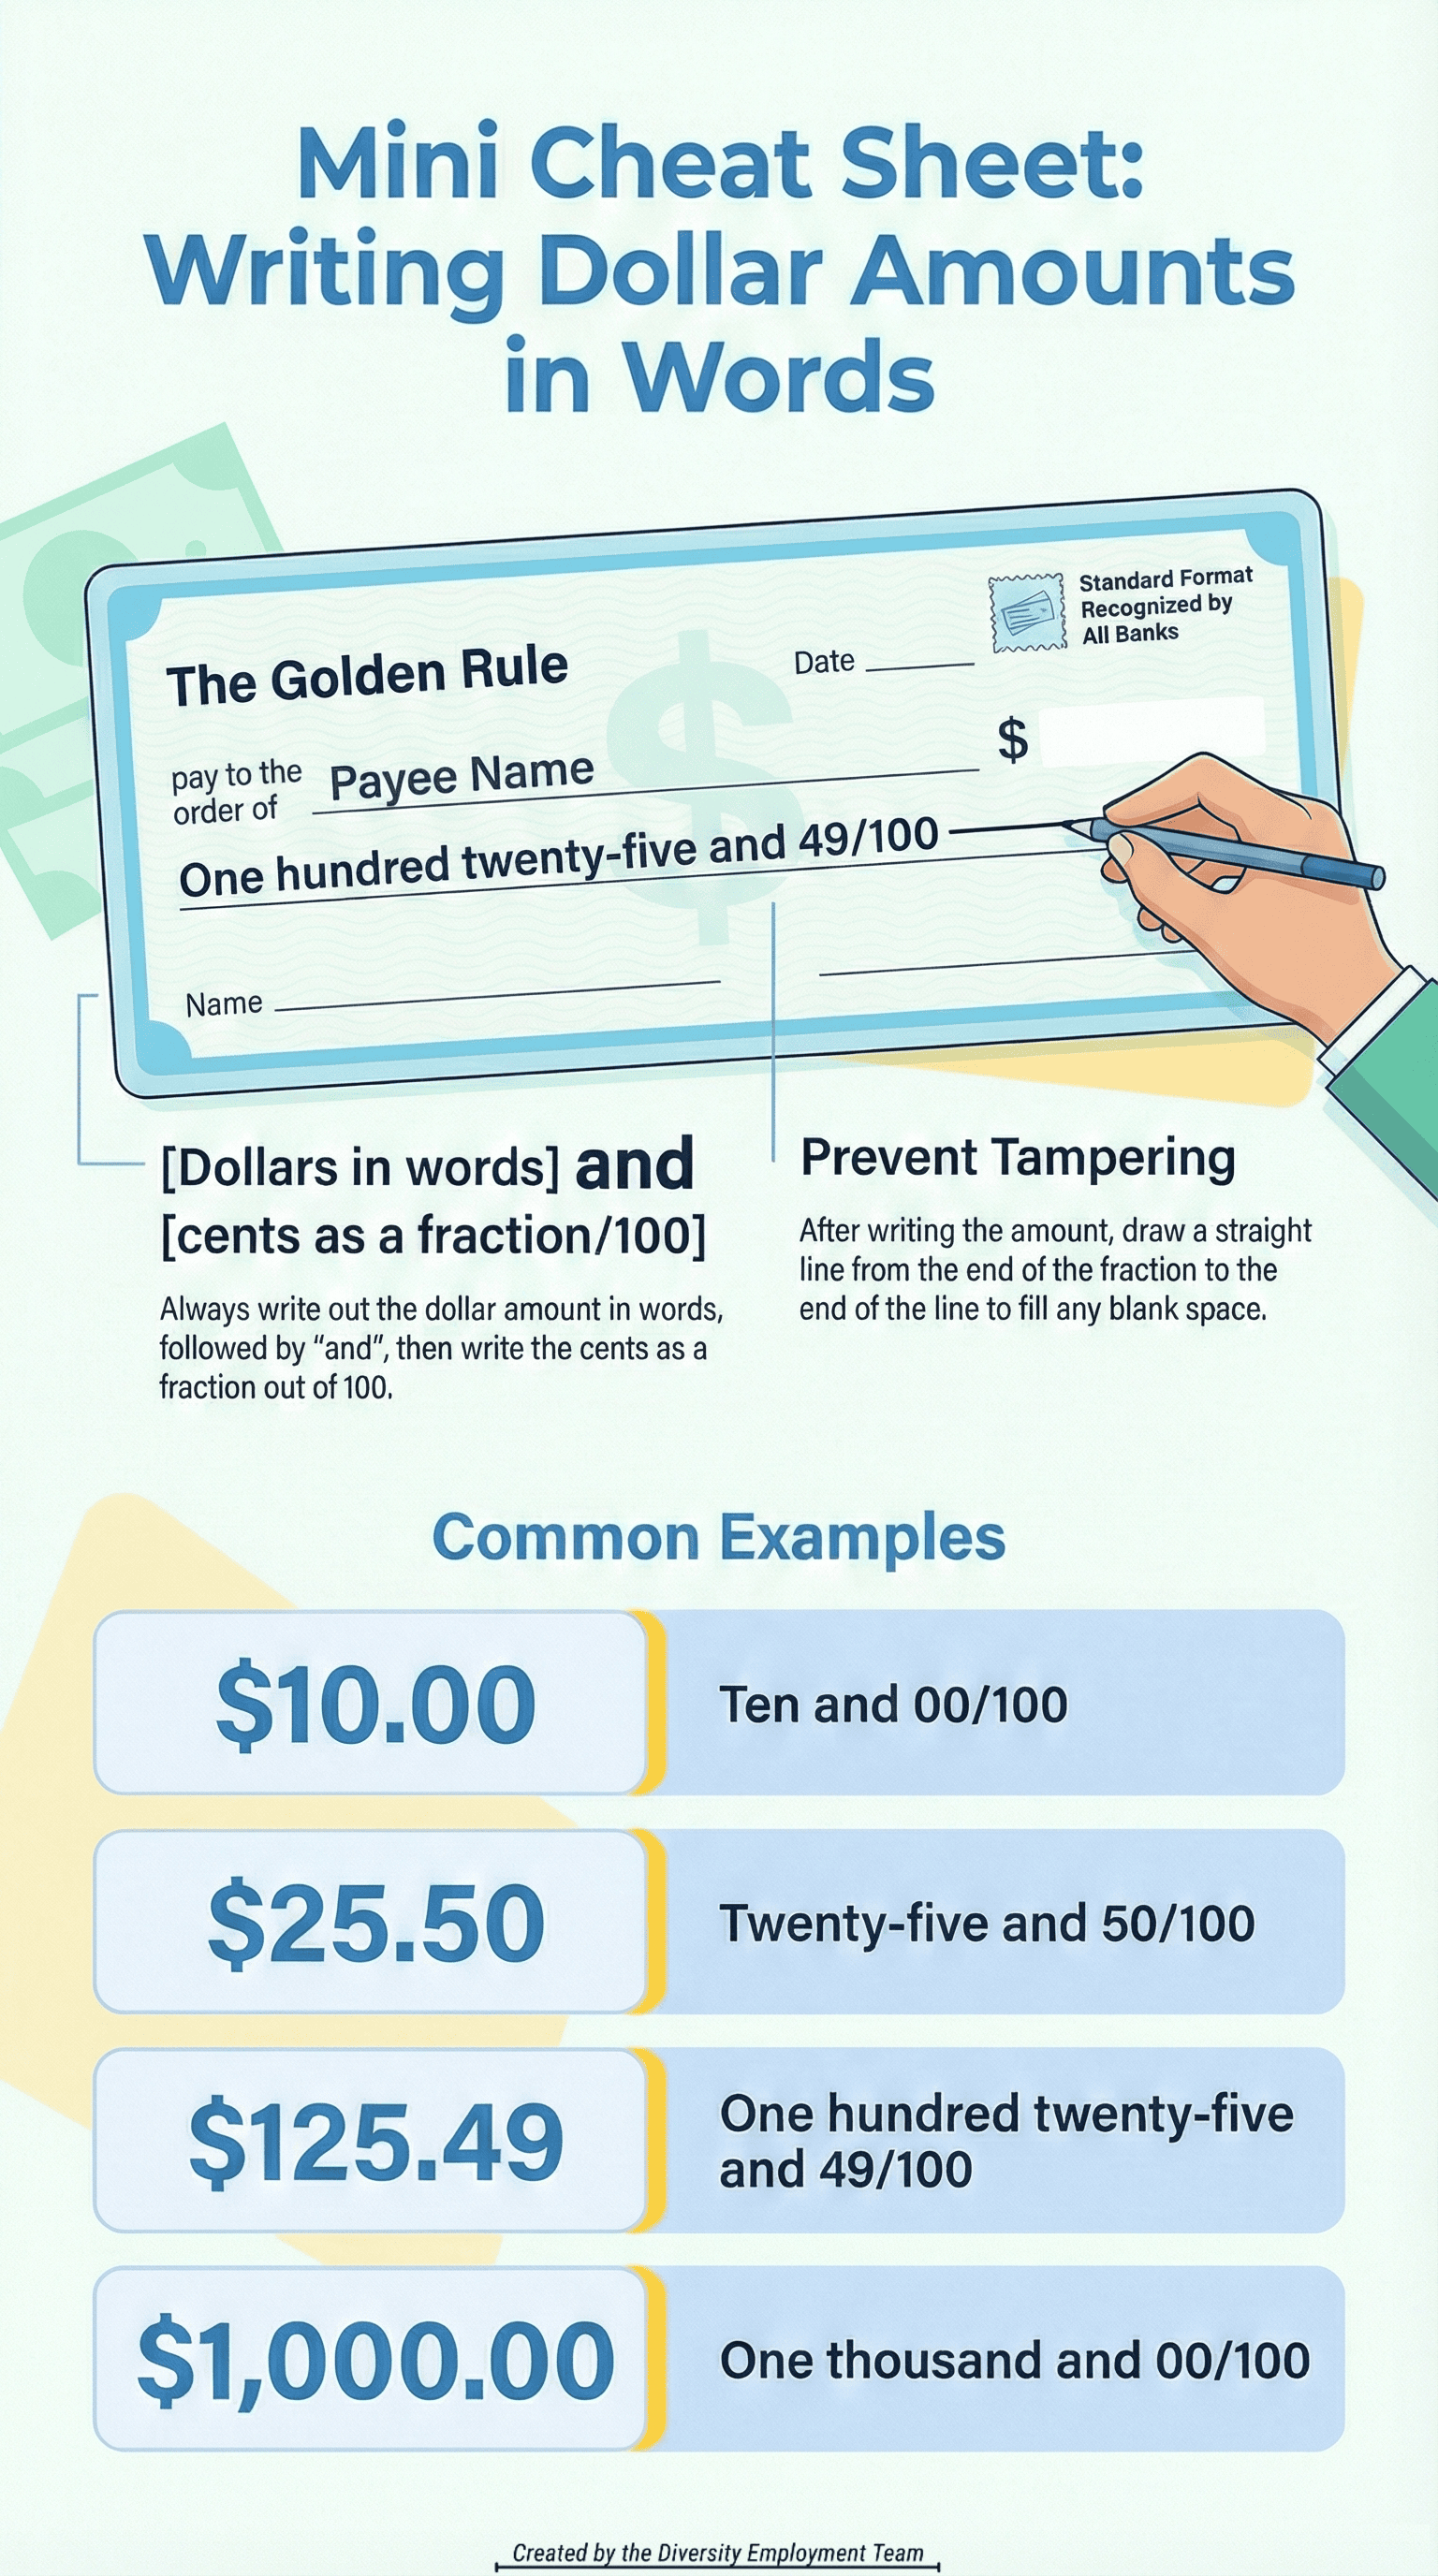
Step 4: Write the Total in Word Format (the Long Line)
Clearly write the dollar amount, in words with the cents as a fraction, on the long line under the payee line.
Format That Works Every Time
- [Dollars in words] and [cents as a fraction over 100]
Examples
- “Ten and 15/100”
- “Seventy-five and 00/100”
- “One thousand two hundred fifty and 49/100”
Tamper-Proof Tip: Draw a parallel line (to the right) after the words if there’s blank space to the end of the long line.
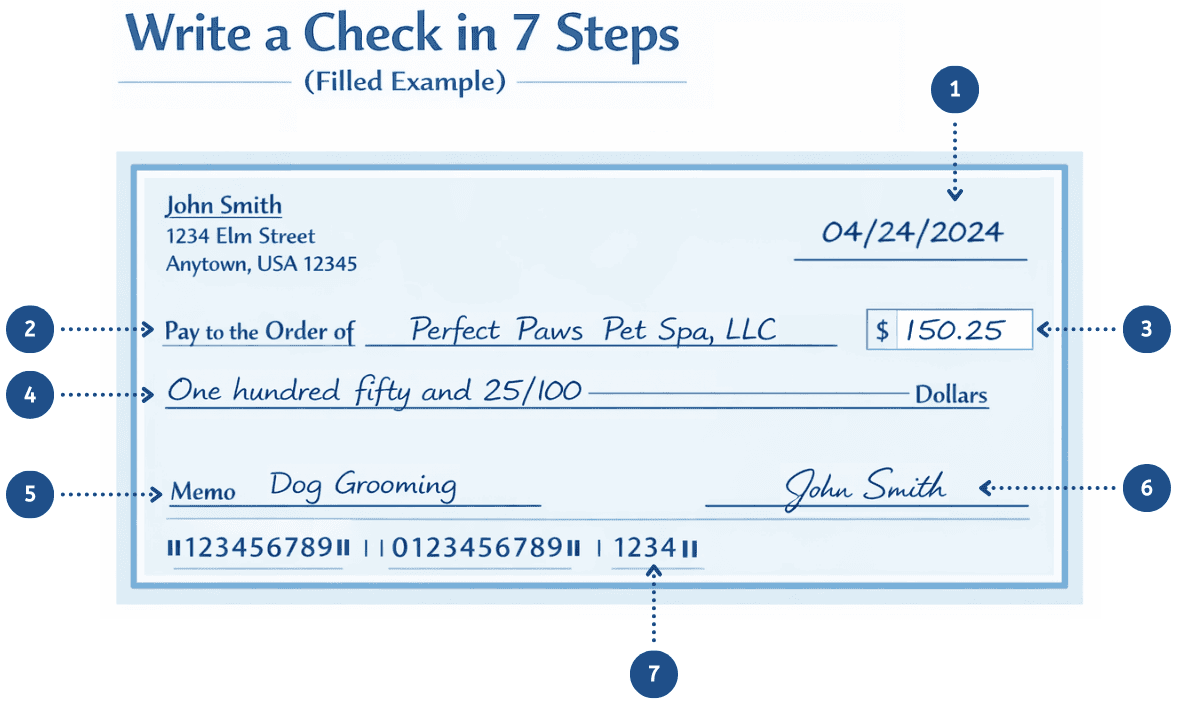
Step 5: Add a Memo (Optional, but Smart)
Memos help you (and the recipient) remember what the check was for.
Good Memo Examples
- “Rent — Feb. 2026”
- “Invoice #1047”
- “Account: 483920”
Memos Matter Most when you’re dealing with things like rent, bills, invoices, reimbursements, or anything you might need to prove later on.
Step 6: Sign the Check
Sign your name on the bottom-right signature line.
If you don’t sign it, it’s basically a just fancy piece of paper with your sensitive information.
No Signature = Not a Valid Check.
Step 7: Record the Payment (Optional)
If you track your spending manually, write down:
- Date
- Payee
- Amount
- Check Number
It’s especially useful if you’re balancing an account or tracking your rent & bills.
Balancing Your Checkbook
This part is important when you manually track your spending. You want to make sure your “Available Money” is actually accurate and that your account is balanced.
Even if you mostly bank online, “balancing” is still useful any time you:
- Write checks (They can take days to clear)
- Have automatic payments
- Use a debit card often
- Want to avoid overdrafts and surprise fees
Balancing your checkbook just means: you keep your own running total, then match it against the bank’s records so nothing gets missed.
What You Need:
- Your check register (paper register or notes app/spreadsheet)
- Your bank account activity (online banking or a monthly statement)
- A pen/highlighter (optional, but makes it faster)
Step-by-Step: How to Balance Your Checkbook
- Start with your current bank balance.
Use the bank’s current/posted balance as your starting point. - List any outstanding items that haven’t cleared yet.
These are payments you’ve made that the bank hasn’t posted. Common examples:- Checks you wrote that haven’t been cashed yet
- Debit purchases still “pending”
- Automatic payments scheduled but not posted yet
- Subtract outstanding payments from the bank balance.
This gives you a more realistic “what I can spend without overdrafting” number. - Add any deposits the bank hasn’t posted yet.
Example: You deposited a check or got paid, but it’s not showing in posted transactions yet. - Compare your result to your check register total.
If your register is accurate, your adjusted total should match what you think you have. - If it doesn’t match, follow this:
- Look for a transaction you forgot to record (Monthly subscriptions get people here constantly)
- Check for a typo in your register (e.g., wrote $52.19 as $521.90)
- Make sure you haven’t written something down twice
- Check that fees/interest were included (bank fees, ATM fees, etc.)
- Confirm the timing: posted vs pending vs scheduled
Common “Balance Killer” Mistakes
- Forgetting small recurring charges (monthly apps, streaming, storage, etc.)
- Not recording your debit card purchases right away
- Assuming a check is “gone” the second you write it (…it isn’t)
- Mixing a pending and posted total without noticing
Quick Rule That Prevents Most Problems: If you write checks at all, treat your check register as the truth and your bank balance as “the bank’s version of the truth.”

Example (With Numbers)
For this example, let’s say your bank’s posted balance shows $1,250.00.
Outstanding Payments Not Posted Yet:
- Check #104 for rent: $900.00
- Debit card grocery purchase (still pending): $45.50
Deposit Not Posted Yet:
- Paycheck deposit: $600.00
Now Do the Simple Math:
- Start with bank posted balance: $1,250.00
- Subtract outstanding payments:
- $1,250.00 − $900.00 = $350.00
- $350.00 − $45.50 = $304.50
- Add unposted deposits:
- $304.50 + $600.00 = $904.50
Adjusted “safe to spend” balance = $904.50
If you’re accurate, your check register balance should also be $904.50.
If it isn’t, that’s your sign to look for a missing transaction, a typo, or a duplicate.
Example Checks (Most Common Situations)
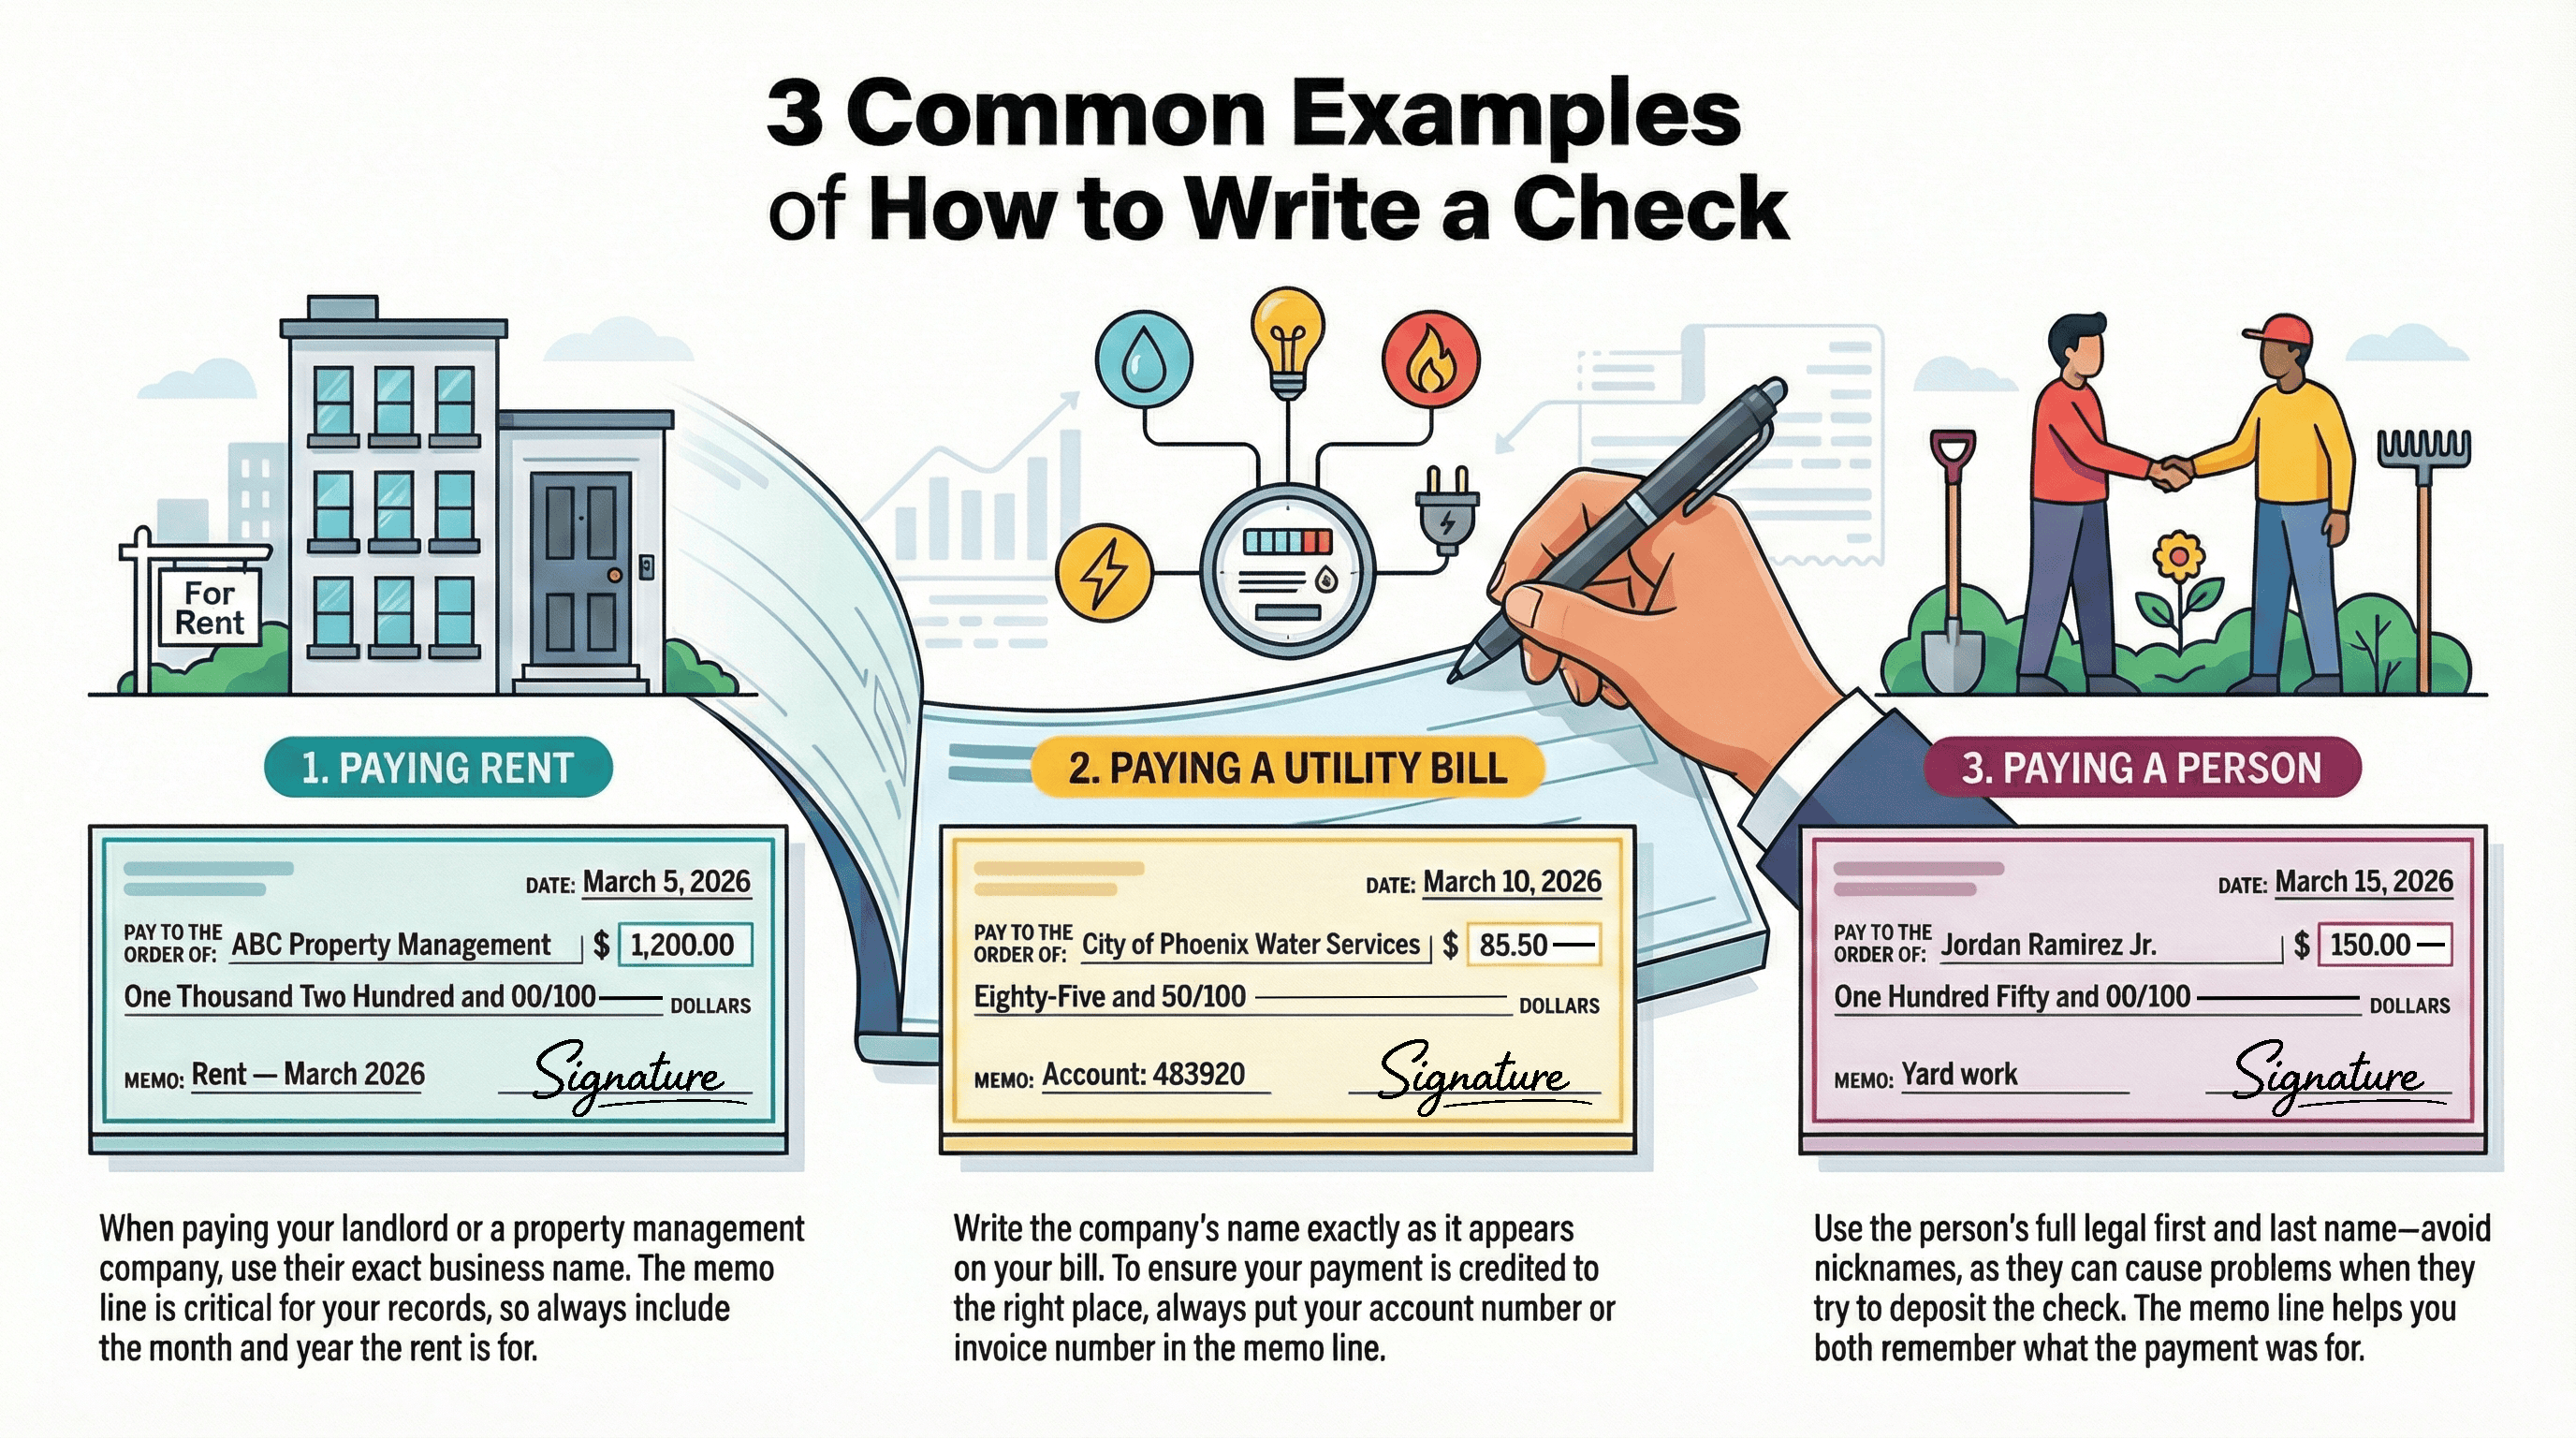
Example 1: Paying Rent
- Payee: Landlord or property company name
- Memo: “Rent — March 2026”
- Amount: exact rent amount
Sample 2: Paying a Bill
- Payee: Billing company name (Exactly as shown on bill)
- Memo: Account number or invoice number
Example 3: Paying a Person
- Payee: First + Last name (Always avoid nicknames)
- Memo: “Yard work” / “Reimbursement” / “Babysitting”
What If You Mess Up?
If you make a mistake (wrong payee, wrong amount, messy correction), don’t try to “fix” it with scribbles.
Your Best Move: Tear (or shred for maximum security) it up and write a new check.
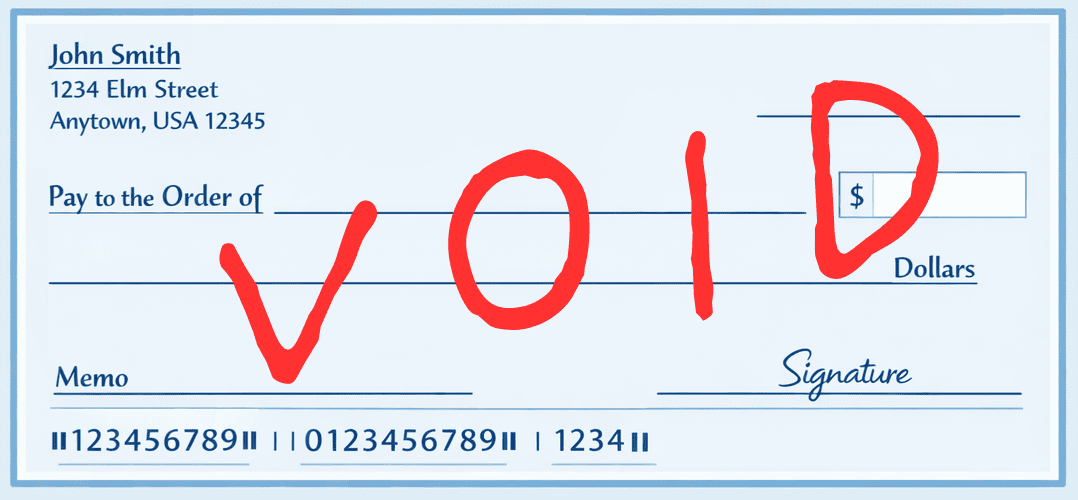
How to Void a Check (So It Can’t Be Used)
Sometimes you need to write a check to set up direct deposit after your successful diversity job search, set up automatic payments, or just show proof of account details. When you don’t want anyone cashing it, that’s when you void it.
Void It Correctly:
- Grab your pen (A red pen is acceptable in this situation).
- Write VOID in large letters across the front of the check.
- Keep the check for your records (or attach it to the form you’re submitting).
Always:
- Make sure to use an easily visible ink.
- Write VOID big enough so that it’s obvious.
- Keep it somewhere safe for your records (or send it, don’t just toss it in the trash).
Don’t:
- Never cover the routing/account numbers, especially if it’s for a direct deposit forms.
- Try to “scribble over” or “white-out” any mistakes and reuse the check.
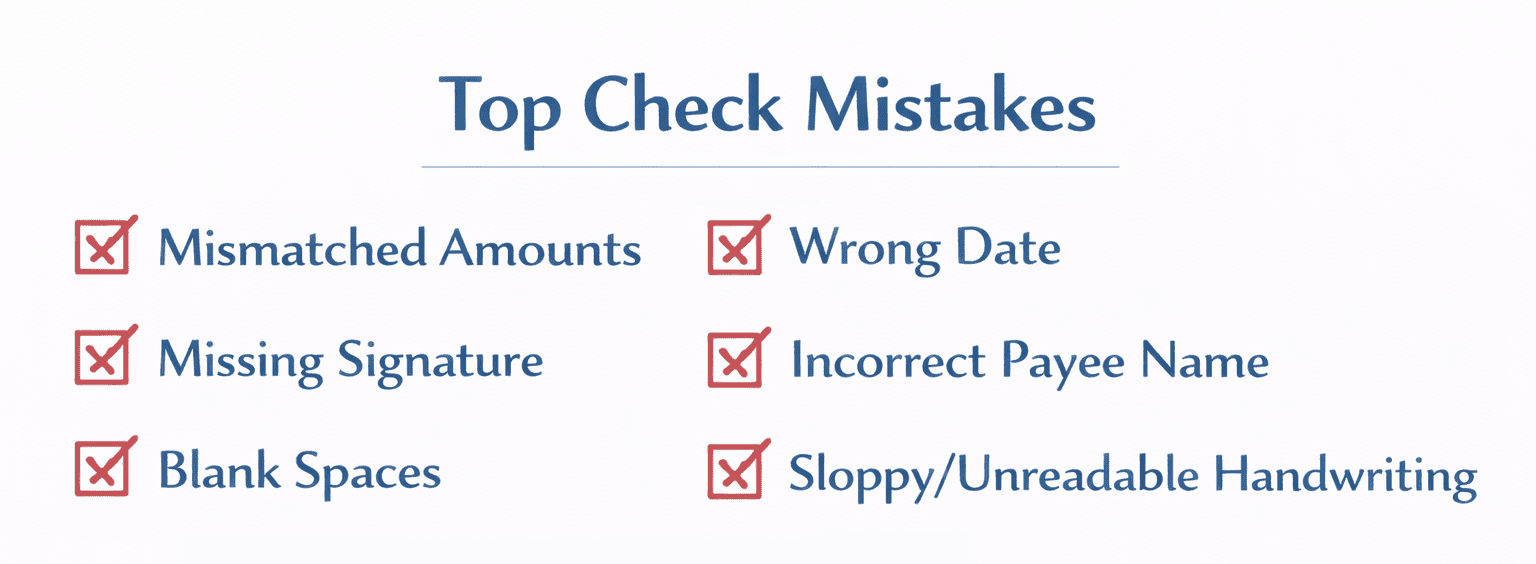
Common Mistakes and How to Avoid Them
Checks are simple, but the mistakes are easily predictable… and they can delay payments or create a mess you have to clean up later.
Mistake: The Number Amount and Written Amount Don’t Match
- Example: box says $250.00, but words say Two hundred and 50/100.
- Fix: Don’t risk it. Tear it up and just write a new one.
Mistake: You Left Blank Space Someone Could Add To
*This is most common on the written amount line.
- Fix: After you finish the words, draw a line through the remaining blank space.
Mistake: You Forgot to Sign it
Without a signature, most recipients can’t deposit it.
- Fix: If you still have it, sign it. If you’ve already sent it, just start a new one.
If you have already mailed it, nine times out of ten, you’ll need to send a replacement.
Mistake: The Payee Name is Wrong (or Even Just Too Sloppy)
If the name is wrong or even just unclear, the bank or recipient can reject it. Again, you’ll need to send a replacement.
- Fix: Rewrite the check. Don’t cross out and “initial” unless the recipient specifically tells you they accept corrections like that.
Mistake: The Date is Wrong
You may write the wrong year (an easy mistake in the first couple months of a new year), put wrong month, or write a future date accidentally.
- Fix: If you haven’t given it to anyone yet, just rewrite the check.
Mistake: You Used a Pencil or Erasable Ink
Checks are permanent. Anything erasable looks suspicious, or begs to be tampered with.
- Fix: Write a new check using a pen (Blue or black ink is always best).
Mistake: Your Handwriting is Hard to Read
If the recipient simply can’t tell what it says, the check will be delayed.
- Fix: Print clearly. Use simple block letters for the payee and written amount if needed.
Quick Safety Basics Worth Knowing
- Keep your blank checks in a safe and secure place.
- If you mail a check, use a secure mailbox (or for best results, drop it off inside the post office).
- If you make a mistake, destroy the check (shred it, cut or tear it up) instead of tossing it intact.
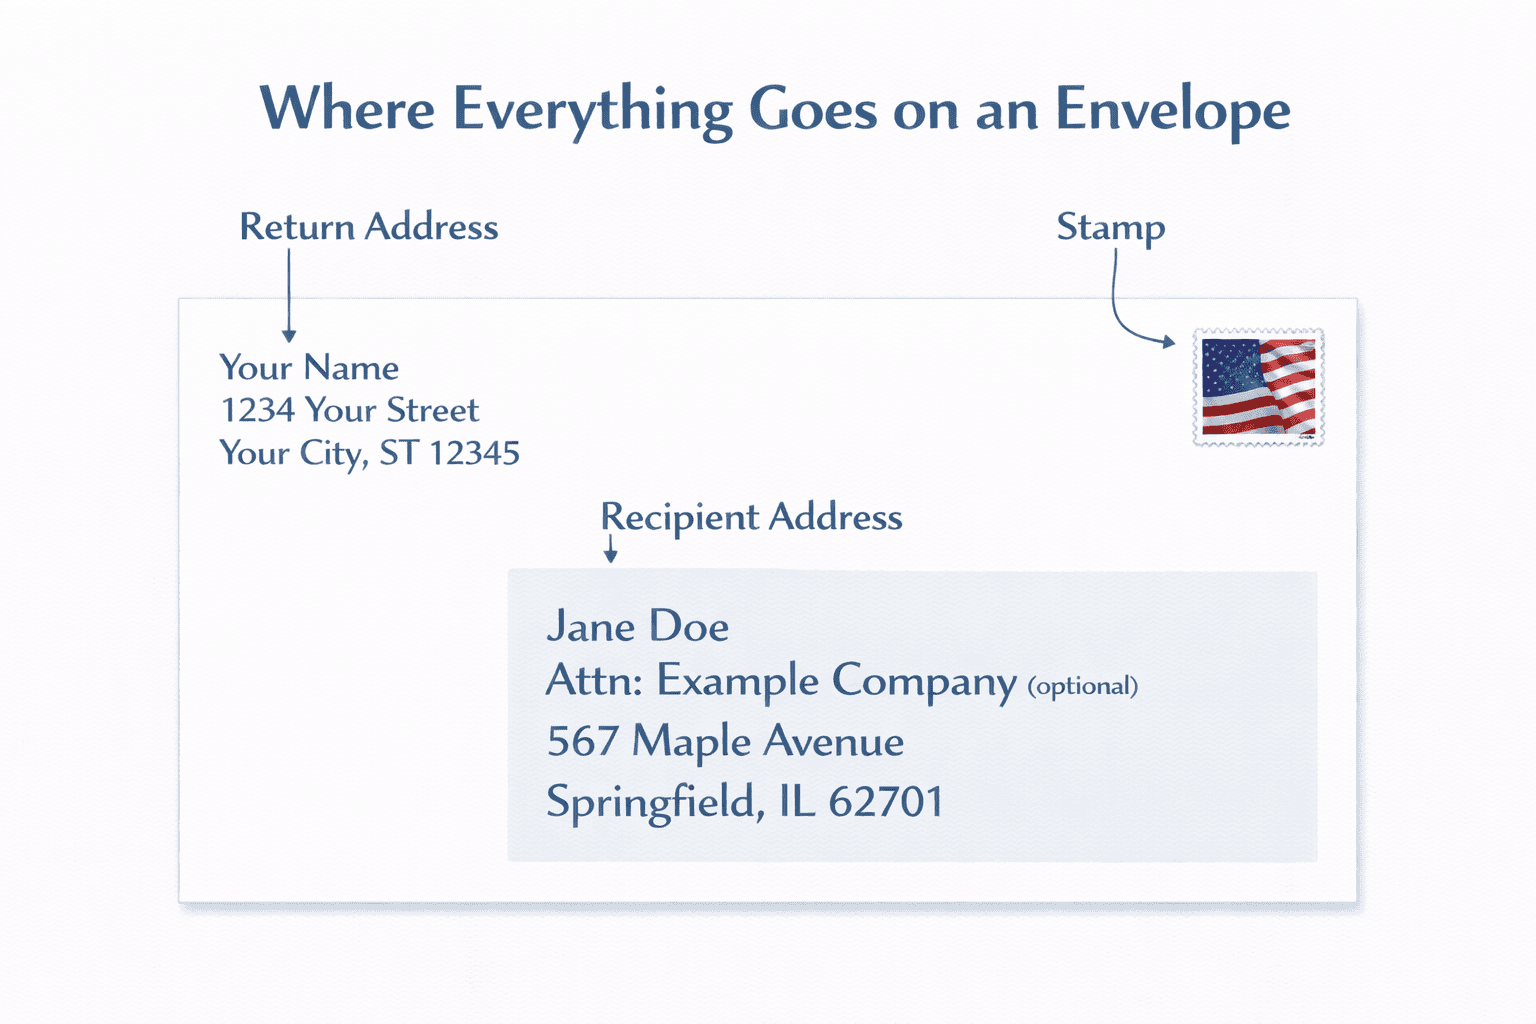
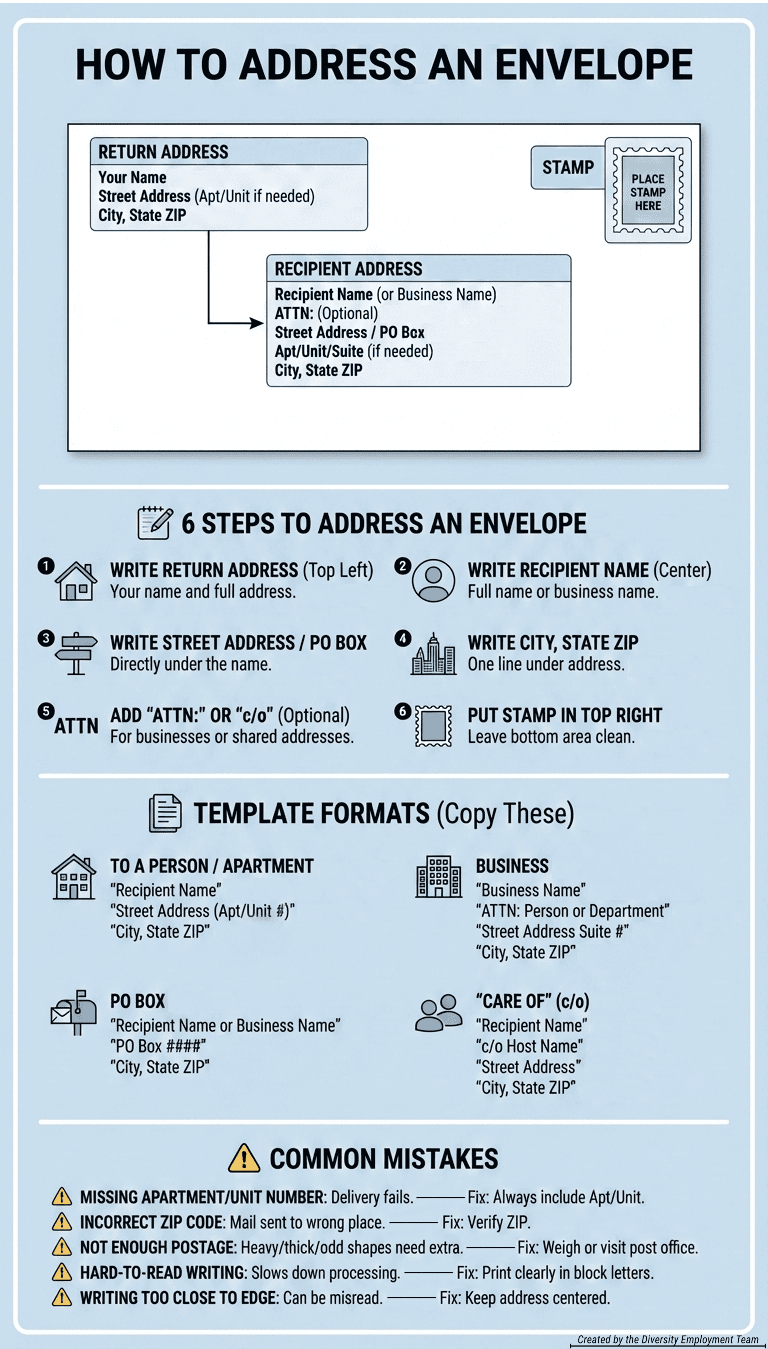
Part 2: How to Address an Envelope (Step-by-Step)
Now we switch from how to write a check to how to address an envelope to mail it.
Addressing an envelope is basically three simple components: Return address (top left), recipient address (center), stamp (top right).
What You’ll Need (Again)
- Envelope + the letter (or check) inside
- Recipient’s correct mailing address
- Your return address
- Stamp (or correct postage)
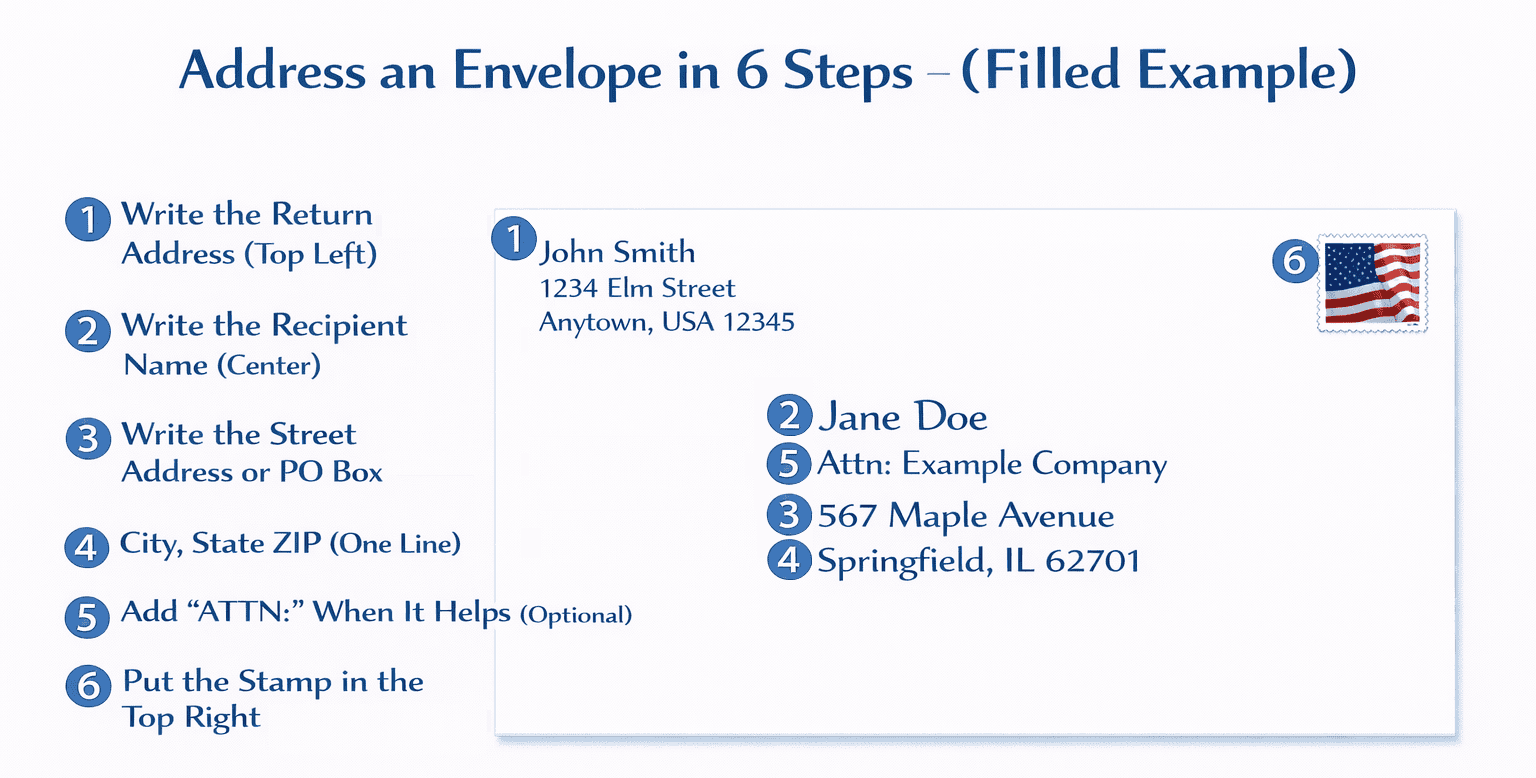
Step 1: Write the Return Address (Top Left)
This is where the mail should get sent back to (you) if there’s any issues or it can’t be delivered.
Return Address Format:
Your Name
Street Address (Apt/Unit if needed)
City, State ZIP
Example:
N. Dante Palumbo
1234 W Example Rd. Apt. 12-B
Litchfield Park, AZ 85340
Step 2: Write the Recipient Name (Center)
Write the person’s full name or the exact business name.
Examples:
- “Taylor R. Nguyen”
- “Perfect Paws Pet Spa, LLC”
- “AB Corp.: Accounts Receivable Department”
Step 3: Write the Street Address or PO Box
This goes directly under the recipient’s name in the center.
Street Address Example:
- 7421 W Bienville Blvd #12-A
PO Box example
- PO Box 1047
Step 4: City, State ZIP (One Line)
This line goes right under the, you guessed it, street address or PO Box.
Example:
- Ocean Springs, MS 39564(-0009)
Tip: If you have your ZIP+4, you can include it, but you don’t have to.
Step 5: Add “ATTN:” When It Helps (Optional)
“Attn:” (meaning Attention) directs mail to a specific person or department within a company. It can also be used when you don’t have a full street address for the individual but know the organization.
Place “Attn: [Name/Department]” on the top line of the center section, above the company name and full address, to ensure it gets to the right person quickly, not lost in general mail.
Example:
- “ATTN: Jason Jones”
or - “ATTN: Human Resources Department”
Step 6: Put the Stamp in the Top Right
This part is pretty easy. The stamp goes in the upper-right corner.
Important: Leave the bottom area of the envelope clean. Postal machines will usually need the space to print barcodes and routing marks there.
Address Format Templates (Copy These)
Use the following as “fill-in-the-blank” patterns. If you copy their structure, your mail will almost always be routed correctly.
To a Person (House)
Recipient Name
Street Address
City, State ZIP
Example:
James Whitehead
7421 W Greenfield St
Seattle, WA 98103
Apartment / Unit
Recipient Name
Street Address Apt/Unit #
City, State ZIP
Example:
James Whitehead
7421 W Greenfield St Apt 2401
Seattle, WA 98103
Common Mistake: Putting the apartment number on the wrong line or forgetting it completely.
Business
Business Name
ATTN: Person or Department (Optional, but recommended)
Street Address Suite #
City, State ZIP
Example:
Perfect Paws Pet Spa, LLC
ATTN: Scheduling
1234 W Example Rd Ste 200
Litchfield Park, AZ 85340
Tip: “ATTN:” helps in big offices where mail is sorted before reaching the right person.
PO Box
Recipient Name or Business Name
PO Box ####
City, State ZIP
Example
City of Phoenix Water Services
PO Box 1047
Phoenix, AZ 85001
“Care Of” (c/o) Someone Else
Use this when the recipient is staying with someone, or you’re sending mail to a shared address.
Recipient Name
c/o Host Name
Street Address
City, State ZIP
Example:
Jordan Hernandez
c/o Taylor Coleman
7421 W Sierra St Apt 12
Surprise, AZ 85374
When You Need More Than One Stamp
One single Forever stamp usually covers all basic, standard letters. You may need extra postage if your envelope is heavier, thicker, oddly shaped, or just headed somewhere that costs more to mail to. For a standard First-Class letter (standard mail), you need more than one stamp once it gets heavier than 1 ounce.
You Need Extra Postage if Your Envelope is:
- Heavier than a normal letter (Multiple pages, cardstock, invitations, photos)
- Thick or rigid (Puffy contents, bulky stacks, padded envelope)
- Non-machinable (Square envelopes, very large envelopes, lumpy/uneven shapes)
- International (Mailing outside the U.S. requires different postage)
- Not an envelope at all (Packages, crates, boxes)
Quick Rule to Follow
If it feels like more than “paper + one or two pages,” you can assume it’ll need more than one stamp.
One Important “Gotcha”: Even if it is under 1 oz, you may still need extra postage if it’s square shaped, rigid, or non-machinable (because it can’t run through the sorting equipment normally).
The Easiest Way to Be Sure
- Weigh it on a kitchen scale, or
- Bring it to the post office (They’ll tell you the exact postage needed)
Where Extra Stamps Go
If you add more than one stamp, keep them on the front of the envelope, near the top-right, without covering the addresses.
Pro tip: Never tape over stamps. Tape can interfere with the letter’s processing.
Common Envelope Mistakes
Most “lost mail” isn’t actually lost. It’s usually just missing one or two important details.
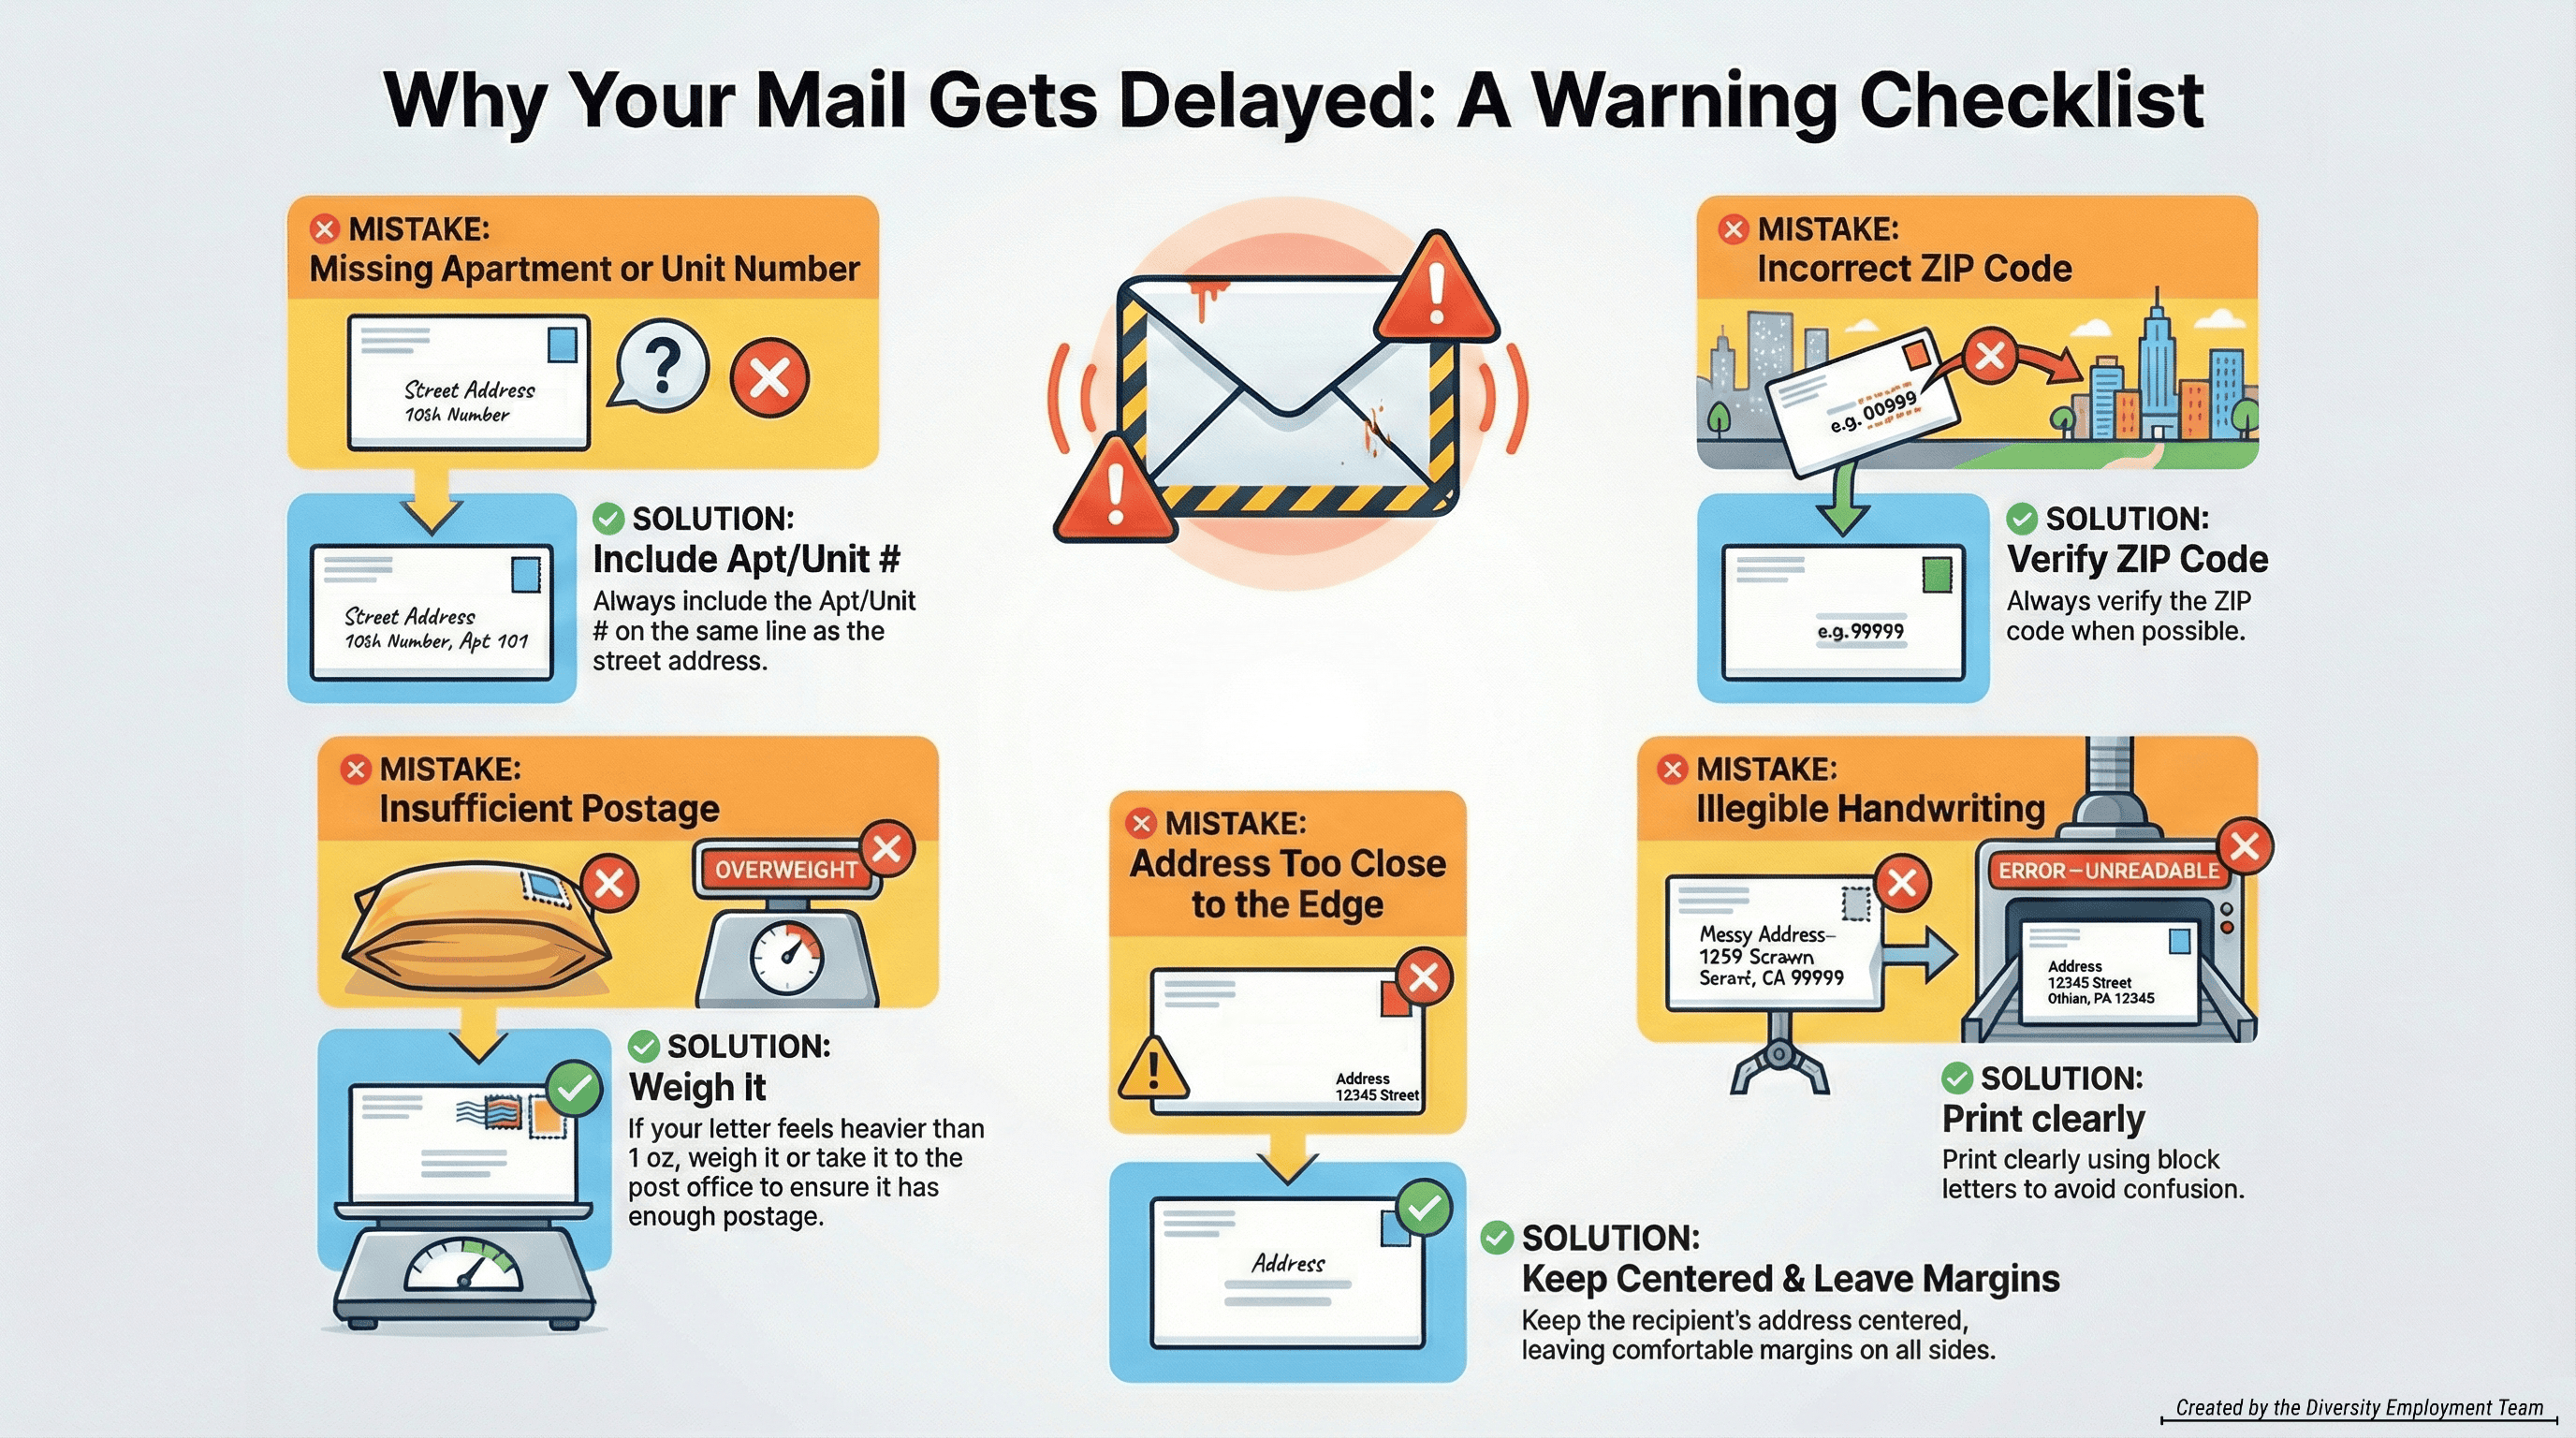
Mistake: Missing Apartment/Unit Number
If the street address is correct but the unit is missing, delivery often fails.
- Fix: Always include Apt #/Unit on the address line.
Mistake: Incorrect ZIP Code
A wrong ZIP can send mail to the wrong part of a city or even the wrong state.
- Fix: Verify the ZIP whenever possible (Especially for businesses and PO Boxes).
Mistake: Not Enough Postage
Heavy letters, extra thick envelopes, or small packages will need extra postage.
- Fix: If it’s anything more than a 1 oz. basic letter, consider weighing it first or taking it to the post office.
Mistake: Hard-to-Read Writing
If a machine (or person) can’t confidently read it, it may get re-routed manually. Which generally slows the whole process down.
- Fix: Print clearly in block letters.
Mistake: Writing Too Close to the Edge
Addresses written too close to envelope edges can be clipped, missed, or misread by sorting machines.
- Fix: Keep the recipient address centered with comfortable margins.
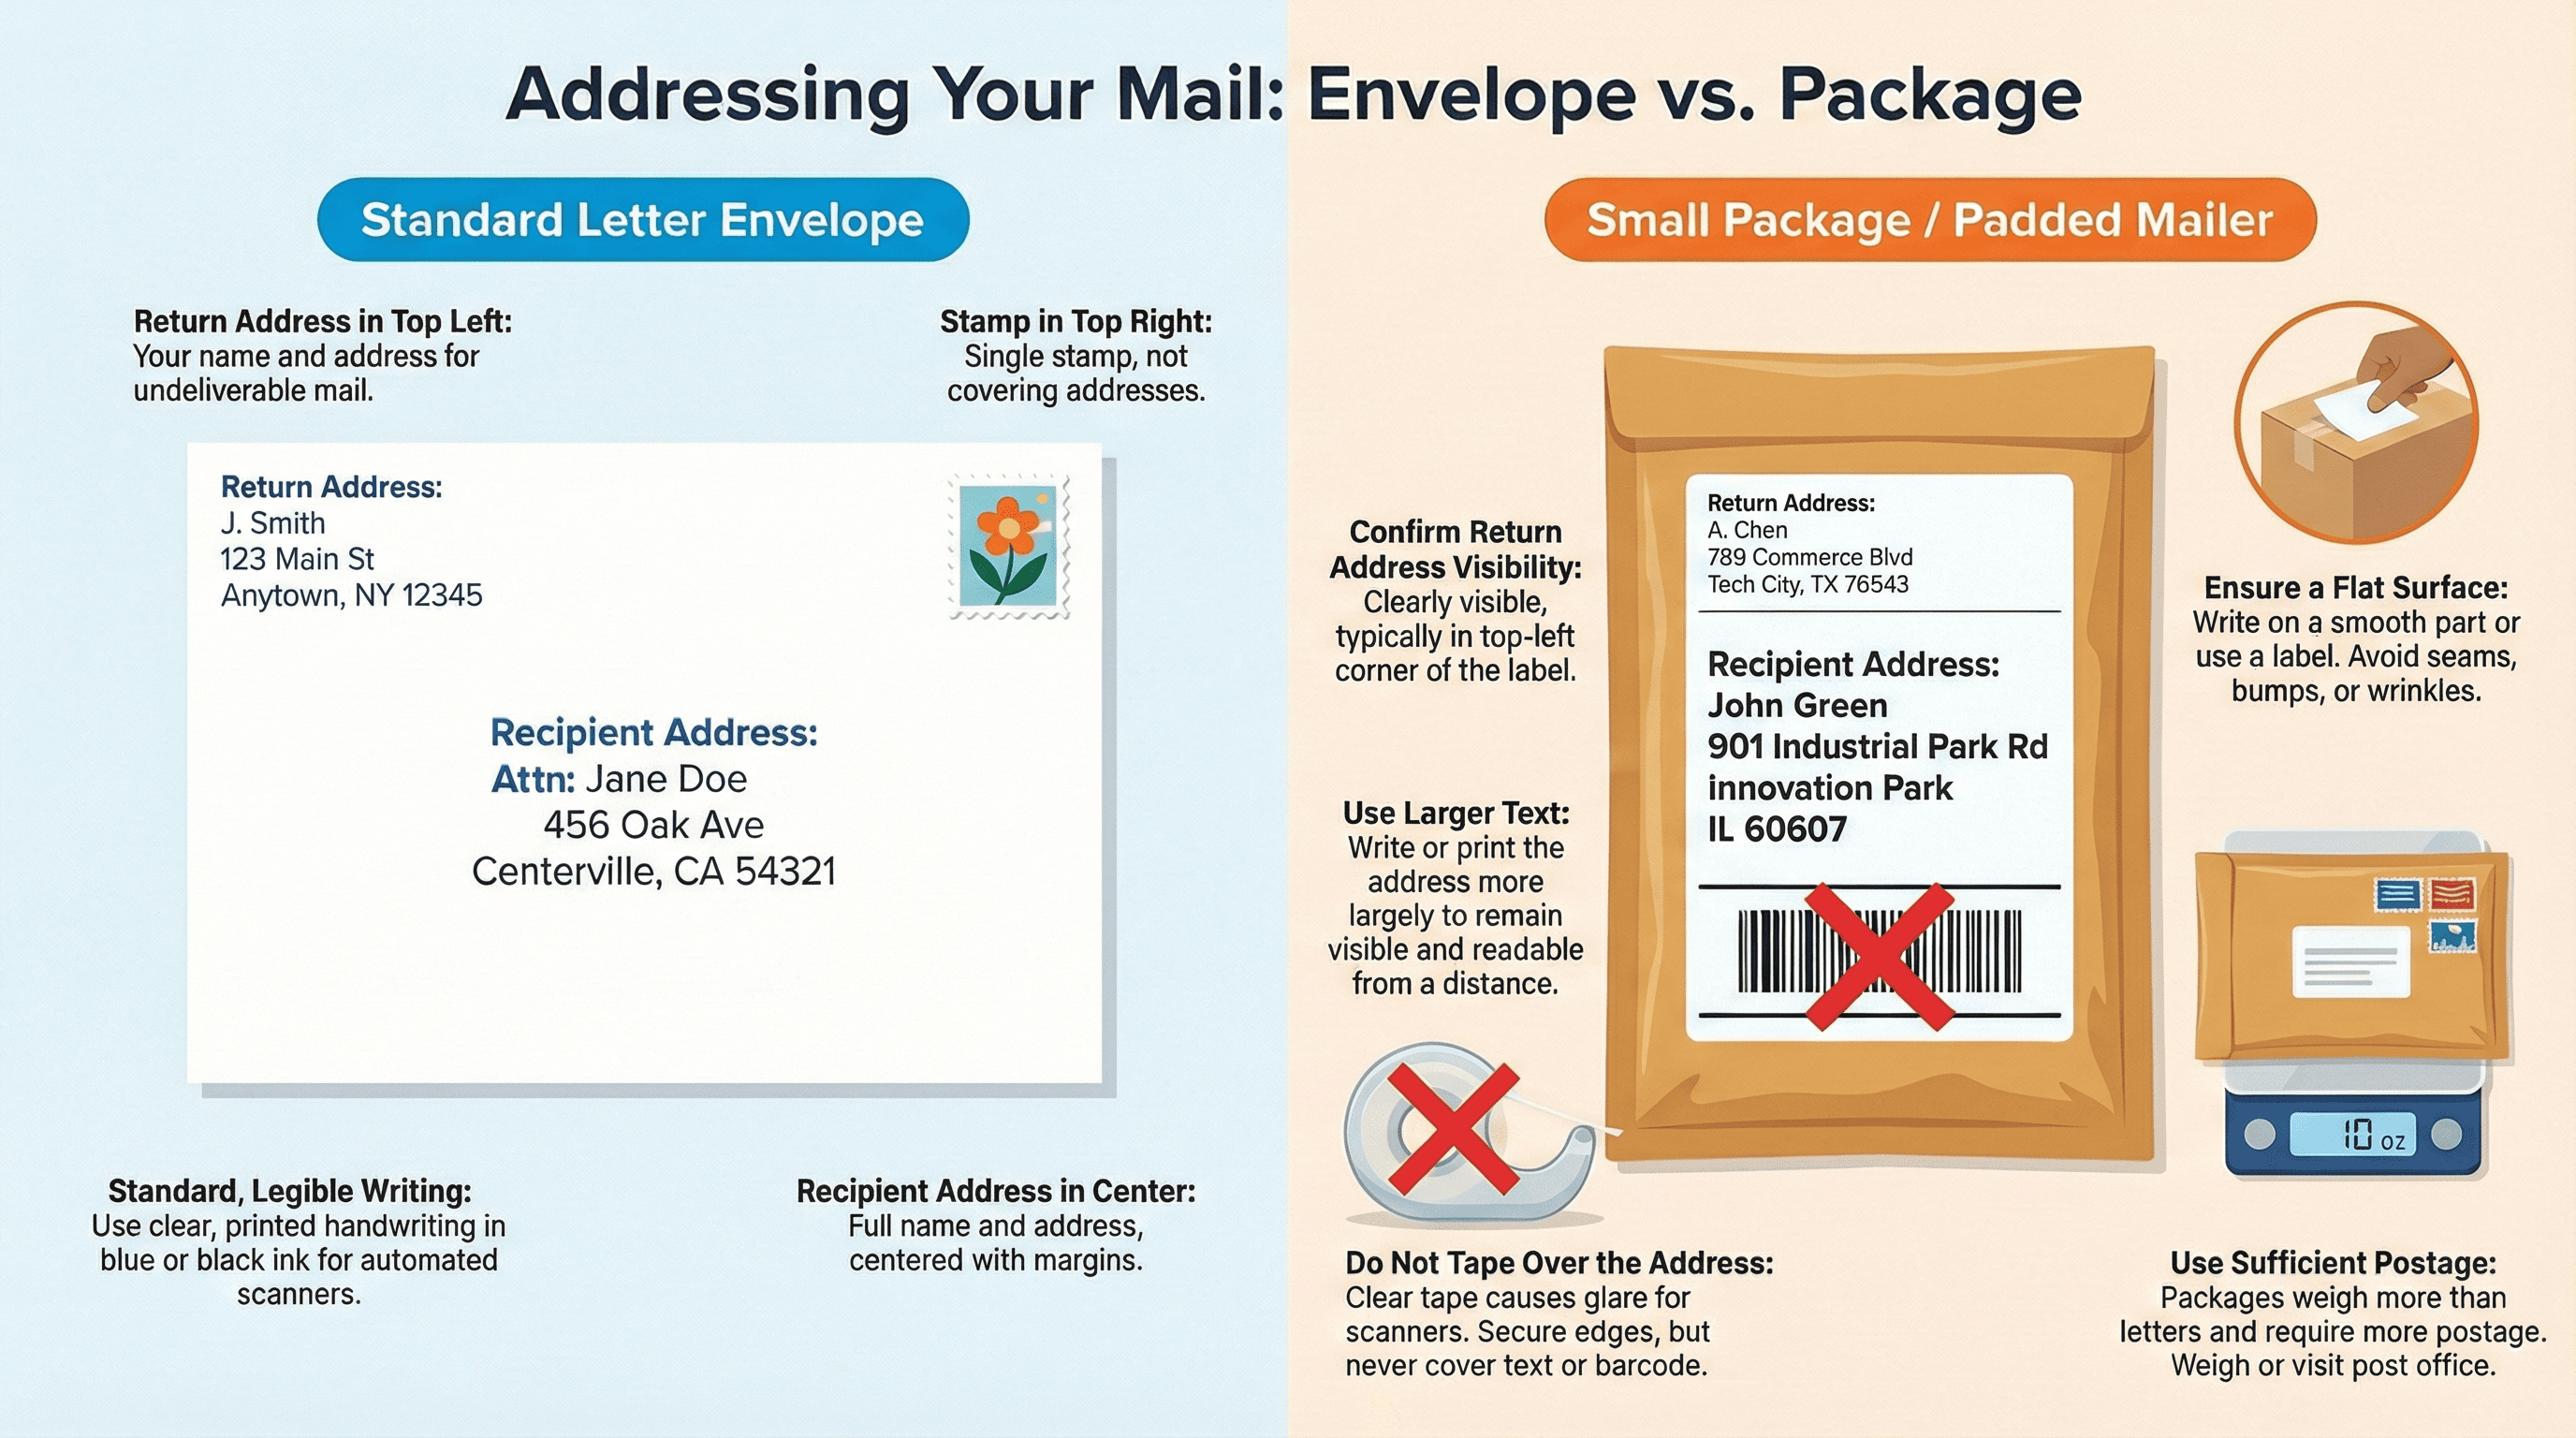
Letter vs. Package (Quick Difference)
If you’re mailing a standard letter in a normal envelope, the steps above are enough.
If you’re mailing something thicker or in a padded mailer:
- Write larger
- Keep the address flat (no wrinkles)
- Don’t tape over the address
- Use enough postage
Printable Visual Guides
Save these references for whenever you’re ready later!
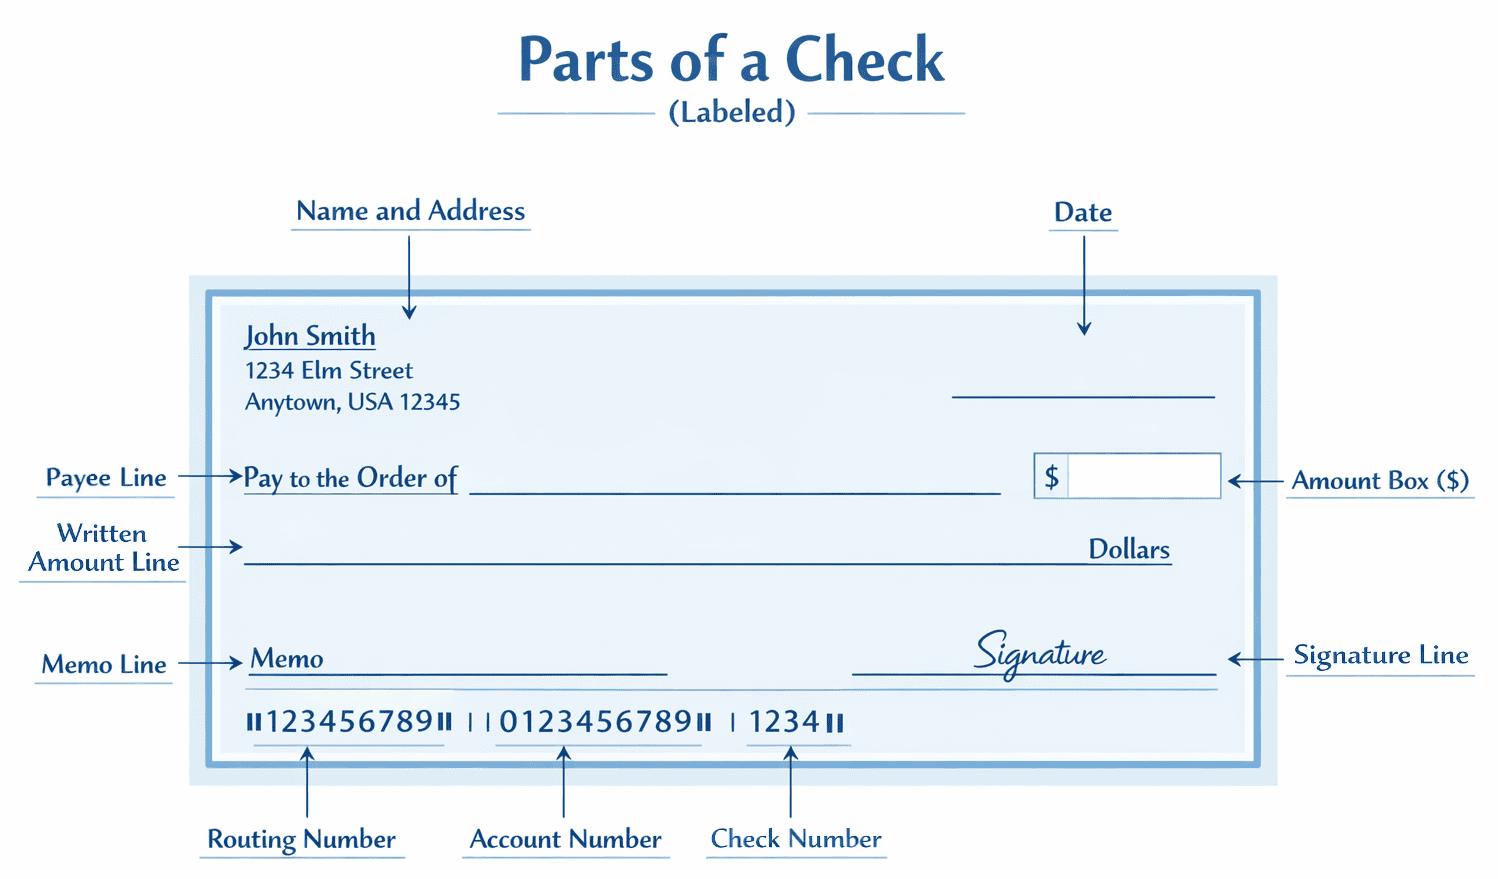
Downloadable Guide: How to Write a Check:
Downloadable Guide: How to Address an Envelope
Mini Cheat Sheet: Writing Dollar Amounts in Words
FAQs
Can I write a check with a nickname?
It’s better not to. Use the payee’s full legal name (or the business name exactly as listed on their bills/invoices). Nicknames can cause deposit delays.
What if I make a mistake on a check?
If it’s anything important (payee name, amount, date, messy correction), the best fix is to destroy it and write a new one. Checks with scribbles can be rejected.
Do I have to fill in the memo line?
No, but it’s smart. Memo lines help you track what the payment was for (rent month, invoice number, account number).
What matters more on a check: the number box or the words?
Both, equally. If they don’t match, it can cause delays, disputes, or rejection. The practical move: just rewrite the check so they match perfectly.
Can I post-date a check (for a future date)?
Only if the recipient specifically asks. Many systems still process checks as soon as they’re deposited.
Where does the stamp go again?
Top right corner on the front of the envelope. If you’re using multiple stamps, keep them together in that same area. (Not overlapping).
What weight requires more than one stamp?
For a standard letter: over 1 ounce generally requires additional postage. If you’re not sure, weigh it or bring it to the post office.
Do checks expire?
Personal checks will usually expire if they aren’t cashed within six months (180 days).
How do I endorse a check to someone else?
To endorse a check to someone else, sign your name on the back of the check in the top section that reads “Endorse Check Here.” Below your signature, write “Pay to the order of” and the Person’s Name you want to sign the check over to. This signals to the bank that you are endorsing the transfer of ownership for the check.
Do I need my name in the return address?
It’s strongly recommended. At the very minimum, put your return address so undeliverable mail can come back to you.
What if I don’t know the ZIP+4?
A regular 5-digit ZIP is fine. ZIP+4 can help sorting, but it’s optional for most everyday mail.
How do I address an envelope to a couple or family?
Use one of these:
- Alex Johnson and Sam Johnson
- The Johnson Family
- Alex Johnson & Sam Johnson
Then list the street address normally underneath.
How do I address mail to an apartment?
Make sure the apartment/unit is included on the address line (or directly under it). Missing unit numbers are one of the top reasons mail delivery fails.
Quick Recap: Writing a Check (7 Steps)
- Date (Today’s date)
- Payee (Exact person/business name)
- Amount in numbers (Include cents)
- Amount in words (“and xx/100” format)
- Memo (Optional but helpful)
- Signature (Required)
- Record it (Optional tracking)
Quick Recap: Addressing an Envelope (6 Steps)
- Return address (Top left)
- Recipient name (Center)
- Street address / PO Box (Under name)
- City, State ZIP (Under address / PO Box)
- ATTN / c/o (Optional when needed)
- Stamp (Top right, add extra postage if necessary)